Shelley Made: 2015

Friday 2 October 2015

Perfect Party Dress - Satin and Tulle

Weddings don't come up very often in our little family, so I wanted to do something special for the little ones in our family to help celebrate.  What better way than to make the girls special dresses for the occasion.   


Because the girls were going to be all dressed up, we needed something for my son as well.  He was pretty easy...we found him a "daddy" shirt, and he asked for a tie.  Finding a tie for a 5 year old proved impossible, lol - so I found a narrow one in a local store, and altered it to fit him.  He looked so cute!

For the girls - I asked them what they would like...  "Sparkly party dresses" was the response.  Hmm.  Ok...  What colour?  Well, one wanted aqua, one wanted purple, and one orange.  Ok...

So the hunt started for fabric.  I got lucky and found a crepe backed satin in the requested orange, purple and aqua.  A complete fluke that I could get the right colours all in the same fabric!  But it wasn't sparkly.  Hmm again.  Then I came across some soft light draping glitter tulle.  Magically, again in colours to match!  It was obviously meant to be!


For the pattern, I knew in my head what I wanted to do - and the Perfect Party Dress by the lovely Jen of Tie Dye Diva Patterns was a great basis.  The fit of her patterns is always right, and I had one shot at this.  My two nieces live elsewhere, so I was going on measurements from a couple of months earlier when I last saw them.


Instead of the standard skirt for the dress, I added two layers of the glitter tulle over the satin - creating a three layer skirt, instead of the single layer the pattern asks for.  It took a little time to get the gathers all right - but it was worth it. 


I knew I wanted to piece some of the tulle into the bodice, so I opted to not use the sash for the front for a simpler look - and just to have the two satin ties which could be tied either back or front of the dress.  I used the lining bodice pattern pieces for both lining and outer.

I wanted the tulle over the top of the shoulders both front and back - for an accent, and to tie into the tulle skirt overlay.  The tulle is terribly hard to photograph - so isn't showing to it's full extent, but it has a lovely glittery light sparkle all over it.

I used three copies of the bodice front and back pattern.  One standard for the lining.  One I cut diagonally from centre front/back to the side seam and retained the shoulder section (making sure to allow extra for the seam allowance).  The other I did the reverse - keeping the bottom section. 


I cut a piece of satin, and one of tulle from the shoulder pieces for front and back, and then pieced them onto the bottom sections.  This then gave me a standard full bodice front and back, to continue the rest of the pattern as normal (omitting the sash front).  Why did I do this, rather than just sewing a piece of tulle on?  Because it's transparent, and I didn't want to see the tulle seam on top of the satin below...

I used some gorgeous crystal buttons on each of the dresses - completely see through to pick up the colours of each of the dresses.  You can't see the sparkles so well in the photos - but they are just stunning.


I made each one a matching tulle flower which I attached to a small alligator clip for their hair, roughly following this tutorial


The tulle needed a lot more layers (12 all up) than the tute recommends, as it is a lot thinner fabric.


So happy with how they turned out.  They fit well, and the girls loved them.  It was pretty cold back home where the wedding was - about 7 degrees, so we needed to layer tops and leggings underneath!


They still looked gorgeous - my 4 year old niece, 8 year old daughter and 6 year old niece, all busy with their activity packs at the wedding :)   Super good idea from my new sister-in-law!!


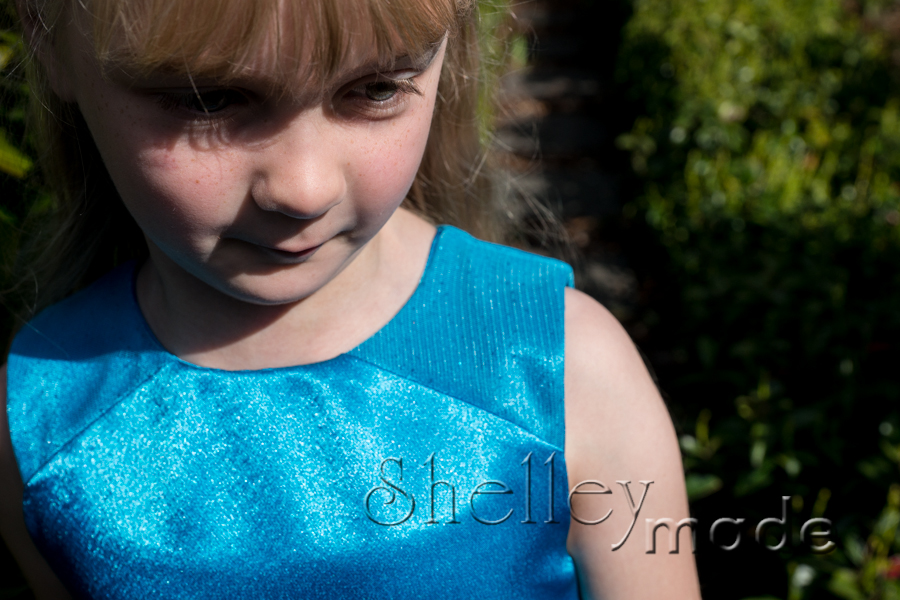
It wasn't ideal photo weather for little girls, so didn't manage to get much in the way of photos, so I managed to convince my daughter to dress up again when we were back home.  And yes...you can still run in a satin and tulle party dress! :)

Thursday 25 June 2015

The Little Dragon Costume

It's been a long time between posts!  Busy, busy, busy.

I spent the day on Sunday sewing for my 5 year old.  He has NEVER in his life worn a costume before.  He is not a dress up kind of kiddie - in fact, he has always run from costumes.  Until this week...

It's his first Book Week at school...and he wanted to go as a character from his favourite dragon book.  Hmmm...how to make a dragon costume...

Long story short - this is how it turned out...


I think he looked pretty adorable!  Plus it was practical - freezing cold winter weather, and easy for him to get in and out of himself.  All in sweatshirt fleece...

What is it?  In reality just a hoodie, and a pair of trackpants.  I took the Tie Dye Diva Hello Hoodie and Snazzy Pants patterns as the basis, in a size 5 - which fits perfectly.

I drafted a set of wings, which I sewed into the arm and side seams of the outer layer of the hoodie (it is fully lined).  I made them full enough so that his arms could go straight up and still not have his movement restricted.


I extended the centre back of the hoodie (both outer and liner) down to include a "tail".  The wings collapse down nicely (helped by the veining detail I added).


And I added a row of spikes all the way down from the top of his head to the bottom of the tail, and a couple of extra spikes at the bottom sides to form the end of the tail


Obligatory tail wiggle photo... :)


You can see he has full movement here (important for little jumping beans like him).  I added three spikes to the front bottom hem of each leg for dragon claws...


Ready to play and fly away...

Thursday 22 January 2015

Little Girl Bedroom Makeover

It's been a while since I posted.  A lot going on in this neck of the woods!  I thought I'd share the final results of the makeover we just gave our little girl's bedroom.  It's just finished and I'm really, really happy with it.  So is she!  Which is the important part right? :)

It took me literally months to design the fabric for the bedding and the decals for the walls, etc.  I kept getting distracted with work.  Unfortunately everyone else's designs were coming before Jessie's, so I gave myself a deadline to get it done.  This is the end result...


I had in my mind an overall image of what we were going to do.  I let my daughter choose colours (purple and aqua blue) and she likes my swirl designs, along with birds and owls - so that was our starting point.  We were thinking a large tree for the wall - and matching branches and birds for the bedding.  So off I went designing...

I did a number of print tests to match and coordinate with the minky I was using for the blanket backing.  I took the final fabric swatches off to the local paint shop to get a colour match for the blue.  The walls had to be blue too apparently!  Big thanks to my husband for agreeing to paint the room.  He did a fine job...

I knew that cutting out a full tree from a sheet of the decal fabric I was using was going to be too much of a mission.  Trust me - cutting out all of those owls, birds and blossoms I had drawn was MORE than enough work!  So after I designed the blanket - I went searching on Etsy to find someone with a plain white tree wall decal that would work.  I got very lucky and found the one in the picture with swirly branches. 


It was a mission to put up - you really need two adults at least - rather than just me and my 7 year old - but it looks great.  I have to say, I well prefer my fabric decals to the vinyl though.  The fabric ones are so easy to reposition - the vinyl is not.  It took about 2 hours to get the base tree up in total...and it was only two pieces!  It's is lovely though - and worth the effort...


Anyway - I used my decals on the door...


On a wooden tissue box cover that I painted the wall colour...


On a "window" for above the bed (see my nice matching decal background/wall colour!)...


And of course the blossoms, owls and birds all over the tree...


I'm very happy with the colour match between the fabric and the decals...it's very very close indeed!


I used a matte satin called "Silky Faille" for the bed covering, the pillowcase, and the little throw cushions.  It's such a lovely fabric.  I backed the bedding in a lovely soft purple minky called "Jewel", which again matched one of the purples exactly.


Here is a close up of the pillowcase, and the matching throw pillows...


Yes - she really does like it!