


This is the tutorial for sewing up my Zippered Pencil Cases and Coin/Treasure Purses, available at Spoonflower here
Finished dimensions approx 9 inches by 5 1/4 inches for
Pencil Case
Finished dimensions approx 4 1/2 by 3 3/4 inches for the Coin/Treasure purse.Illustrated here is the Pencil Case, but the construction method is identical for both.
Materials
- Zippered Pouch Cut and Sew Panel from Spoonflower
- Optional fusible interfacing if using a lighter weight fabric such as quilting cotton or sateen
- Coordinating zipper at least the width of the outer fabric panel
- Coordinating thread
Cut out the matching labelled fabric panels
You will end up with two outers, two lining and two zip end
covers

If you are not using linen or one of the heavier weight fabrics, I would recommend you apply fusible interfacing to the outer fabrics before starting.
We first need to add the zip end covers. Take each cover piece, and fold it in half - wrong sides and short ends together.
To find out where to sew the end covers - place the zip on the top of
one piece of outer fabric. Align the
ends of the zip covers with the edges of the outer fabric, as shown in the
photo.


Next - we create a sandwich of sorts. Place one outer of fabric face up. Place your zip face down and aligned with the
raw edge at the top, and your zip covers at each side edge.

Place a lining
piece of fabric over the top of this - to complete the "sandwich".

Put a zipper foot on your machine.
Sew a 1/4 inch
seam all the way along that top edge to secure the layers - making sure to more the zipper pull out of the way as you go.
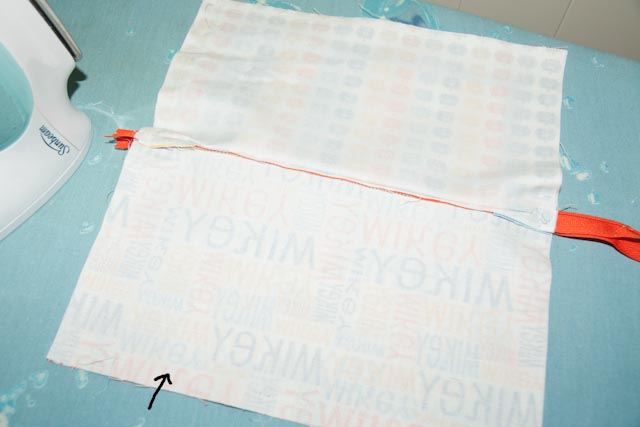
Fold the pieces right sides out. You will now have this - one side of the pencil case done:

Now, we should have something that looks like this...


Now is a good time to give it a press. Pull the four pieces of fabric away from the
zipper. Press along the folds.


Finally - sewing up the sides. Switch back to your regular foot. With right sides together, outer to
outer, and lining to lining - sew a 3/8 inch seam around all edges. In the photo below I've folded back the linings so you can see which fabrics are matched together. Leave a gap of 1.5 inches on the long edge of
the lining so you can turn through. Make
sure you have opened the zip before you do this - or you will have all sorts of
difficulty turning through otherwise!


Sew very slowly over the bulk at the zip ends...and make sure you
"squash" the zip towards the lining on both sides - not towards the
outer fabric. The zip teeth should be next to the outer fabric, and the zip fabric is inside the lining... See photo for details...

Trim off all four corners, so your corners will sit nicer after turning. I also like to trim out some of the bulk where the zip ends are to get a better finish on the zip ends once turned. Clip off any zip ends that overhang if you used a longer zip like I did.
Turn out through your opening. Poke the corners out with a knitting needle,
or other blunt instrument.

Sew closed
the opening in the lining with a very small seam.


Wow great pencil case,i want this.Thanks for sharing.
ReplyDeleteThank you! You are very welcome :)
DeleteVery clever! Love the back to school ideas! I am a new follower!
ReplyDeletethank you!!!
ReplyDelete