Shelley Made: 2013

Tuesday 31 December 2013

Ombre Hearts Dress

A post for the New Year...best wishes for 2014 to you all!

I did some sewing for Christmas, as usual.  First was a dress for my 6 year old. 


I used the Fair & Square dress from Tie Dye Diva again (it's a favourite of mine), but wanted to change it up a little as I've made it maybe 6 times now?!

There was this one, and this, and this...plus a few more I haven't shared, LOL!

So, I added some little capped sleeves.  I've described how I did it below if you are interested in trying it yourself!

Really a very simple addition - but I love the way it turned out.  In fact, I think this dress is now my favourite of all time.

Some detail pics to show you...


First, the sleeve I added. 

I also chose to bind the lower armhole with some spare white faille instead of double folding the edge - just to be different!


Front and back views (very happy I found the perfect matching button!!)


My matchy-matchy seam!  I always make this dress now with one centre back seam, rather than two side seams.  Only one seam to match up!


Then some action twirls shots from Christmas Day!  I love the way this fabric design seems to ripple!


I used my own fabric design, printed on Silky Faille - this one here called "Ombre Paper Hearts":

Ombre Paper Hearts

I absolutely love the way it printed.  A gorgeous raspberry red with lovely matching lighter and darker tones for the ombre hearts.  It is such a wonderful soft, draping fabric - and so nice to the touch.  It also has a teeny bit of a sheen in the right light!  Plus it washes AMAZINGLY.  My daughter wore it to the movies - she came out covered in sticky melted chocolate and icecream.  All down the front of it - brown and orange.  My heart sank!  Not only was I able to spot clean the worst of it off in the cinema bathroom (rubbing with bathroom paper towels!) - when I finally got it into the wash every single thing came out.  Awesome!!!


Anyway, for those of you interested...to add the sleeves:

I basically drew an oval that was 7 inches high, by 6 inches wide - then chopped it in half down the longest diameter (so the straight edge was 7 inches long).  That was the template.  I cut two out of my fabric (one reversed) for each sleeve. 

Sewed a half inch seam along the curved side with right sides together.  Clipped the curve, turned, and pressed.  Gathered the straight edge in by an inch, so it then measured 6 inches... 

When the bodice outer and inner have both been completed (i.e. you have sewn the front to back at the shoulders) - and just before you the outer to the inner to complete the bodice - this is where you add the sleeve.  Line the gathered raw edge up with the raw armhole edge of one of the bodice pieces, and centre it on the shoulder seam (right sides together).  Do this for both sleeves.  You will need to tuck the curved edge of the sleeve in so you don't sew over it when you sew the neckline.  Place the other bodice piece on top like normal now, and sew away...

I love the added sleeves - and I'm sure I'll do it again someday...soon!

Happy New Year!


Thursday 5 December 2013

Stars in Stripes Dress

Quite some time ago I created a fabric design - I called it "Falling Stars in Stripes".  The fabric design was inspired by the falling binary code images in the movie "The Matrix"...maybe you remember that one?  I have to admit to it being one of my all time favourite of my fabric designs... 

I entered it into the Spoonflower fabric of the week contest way back in July 2012...  The theme that week was "Stars and Stripes".  To my delight, it was a top 10 finisher - and I always had in my mind to make a dress for my daughter out of it.  Now I finally have!


You can see the detail of the stars a bit better on the closer photos...


You can see the slight sheen on the fabric in this one...


This time - I just embellished with simple silvery star buttons.  No flower or anything fancy.  The fabric was detailed enough not to need anything much.


I chose Spoonflower's new Silky Faille, which is a stunning fabric.  So soft, satiny and prints with SUCH vibrant colours.  She loves wearing it - and the faille washes up brilliantly.  You can click the inage below to see the full repeat on Spoonflower...

Falling Stars in Stripes (Zoom Out for Effect)


The pattern I used was one of my favourites - the Fair and Square from Tie Dye Diva.  I've used it many, many times now...and I'm sure I'll use it again very soon.  It's getting hot here - and it's a great dress/top pattern for the heat.

A few things to note about the Silky Faille.  Use a microtex needle.  Keep the fabric taut when you sew - but don't stretch it - just enough pressure to keep it firm.  It does not hold a crease very well - which is awesome for washing (I'm not a keen ironer!) - but something to remember if you have to crease small double-turn seams like under the arms of this dress.

The end result - a flowy, drapey, soft and very comfortable little dress. 


Saturday 23 November 2013

The Ruffle Pop Skirt

I'm finally back at the sewing machine, after a frantic few weeks of custom fabric designing, and photography assignments!  I've got a few projects on the go - this is the first...

I had a piece of fabric looking for a home...and decided on a quick and simple skirt for Miss 6.  The fabrics in the skirt are two of my designs...if you want to replicate the look, links to get hold of them are at the bottom of the post.

This is another from Jen of Tie Dye Diva.  I like her patterns as they are fast and easy and I don't have to read the instructions over and over again to get it right!  It's called the Ruffle Pop skirt, and it goes from a size 2 through 8.  A great quick sew.

I opted to use pre-ruffled eyelet for the trim.  I had no idea it even existed till last week...  I'm not a big ruffle fan - all that gathering usually puts me off!!  But this was too too simple, and I will most certainly be using it again.  Plus I think it looks really sweet :)


The hardest part of the whole process was getting a photo of the finished skirt!  My daughter has taken to silly "model" posing whenever I ask...  It's a bit like pulling teeth to get a decent shot right now...but you get the idea anyway!


The main fabric for the skirt is this one:


Birdy Daisies Aqua Blue v2.1 Smaller

and the matching stripe is this one:

Yellow and Blue Stripe

Have a great weekend!
Shelley

Sunday 1 September 2013

Personalised Blankets and Cushions!

I am very happy to be able to finally announce that my Etsy store is full of new listings!

I've been planning this ever since I started designing the fabrics...so near on two years now.  So today is a rather big day for me!

Here are a few examples:


I have cushions (with and without inserts), matching blankets and matching greeting cards.  I will add more items to the collection over time...

Meet Emerson - my lovely little model...  With her blanket!


In a range of lovely bright colours - in any name you like.  Available plain, or with owls, or birds, or butterflies, or even robots!:


 Matching greeting cards are in my store as well...

A few of the fabric options


The minky I use to complete the cushions, and for the blanket backs is SUPER soft and snuggly...


Would love to hear what you think of them...  You can see the complete range in my Etsy store here.

Saturday 31 August 2013

A Mermaid Costume...

A quick post today to share my latest sewing project...  My daughter has been asking for a mermaid costume for about 3 years I think.  She is off to an Under the Sea birthday party today - so she finally got her wish!

I like my mermaids to be a little more modest...no bikini top for this one!  I did not choose the fabric - she did.  Hence it is very very shimmery and very very pink! 


The tail morphs up into a "land princess".  Necessary for mermaids out of the water of course.


She is rather chuffed with the end result I think!


I used the great tutorial from LiEr over at ikatbag for the tail.  Worked a treat.

For the top - I created a cylinder from under the armpits to the waist.  Attached two long straps on an angle in the seams, that we could tie up behind her neck to keep the top in place.

All super stretchy and comfy.  I can see it being worn every day for a while...!

Thursday 1 August 2013

Moo Mail!

I'm about to embark on something new...and I'm quite excited about it!

So, to prepare for that new project, I needed something new myself....swing tags, labels, and even a business card.

An acquaintance recommended Moo.com - so I gave it a go.

I set off and designed everything I thought I would need, and look what arrived!


I love the way they have turned out.

Here are the Moo mini-cards (which I will be using as swing tags - they are a great size for that).  I love that you could print multiple different backings at no extra cost.  These are the matte finish ones


My book of stickers - which I am amazed at the quality of.  I think this is my favourite part of the order.  They are lovely and glossy, and you can have up to 50 different pictures in the one little book!:


Finally my business card..


They gave me a discount code to share around...which I normally wouldn't do...but since I'm so happy with the products...you can get 10% off your first order by clicking here.

Tuesday 25 June 2013

Perfect Party Dress - Winter Edition

Hi there,

I actually made it to the sewing machine!  A long overdue return...

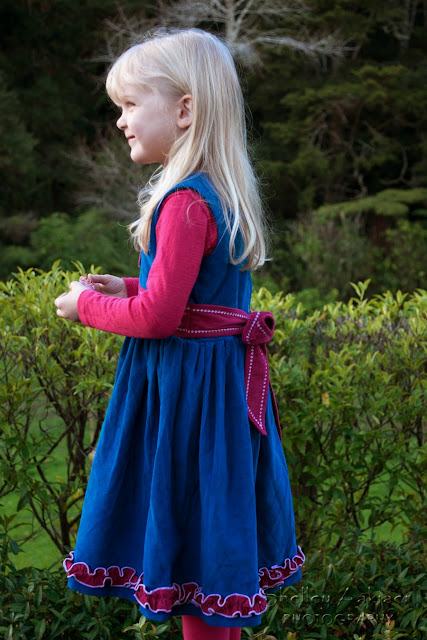
It's winter here, and my 5 year old has decided she will NOT wear jeans/pants anymore.  It must be dresses.  So I decided she needed some new ones.  In corduroy.

I chose the Perfect Party Dress by Tie Dye Diva.  I love her patterns, and thought this one would translate well into a winter weight dress.

Here it is:


She has declared it her favourite dress...

It has a fully lined, button up bodice, and a lovely twirl factor (very important for a 5 year old).

Some of the details:

The applique on the front, is one from Bunnycup Embroidery.  I chose to use the two fabrics from the dress, and alternate the directions of the cord stripes. 


I thought the "ragged" edges tied in well with the frill on the bottom of the dress.


Yards and yards of frills!  I cut the fabric for the frill and the sash in the opposite direction to the main blue.  Just because I could.  Plus I like the additional contrast.

I added a decorative stitch to the sash and ties...this was NEARLY the undoing of the dress I have to say.  Trying to get a straight line was a challenge and took forever.  Unpicking decorative stitches is not my favourite pastime. 


With a couple of full length shots to finish with...


I will be making this again in corduroy...or maybe a drill?


Yes, maybe drill for the next one... :)

Friday 17 May 2013

DIY Custom Cufflinks!

I know cufflinks might sound a little old-fashioned, but my husband still wears them, and has quite a few pairs.  So, for his birthday I decided to make him some myself, out of my own fabric designs.

It's really super super simple, but there is a little trick to it...so I thought I would share it with you today.


Here is the finished cufflink set, along with it's matching necktie, in a little box ready for giving:


You will need:


One set of cufflink blanks (or photo cufflinks - I got mine here)


Scrap fabric of your choice (I used this one here)
Iron on interfacing
Iron
Scissors


The steps:

1.  Iron some interfacing onto the wrong side of your fabric.  I tried without it the first time - just too fiddly.  The stiffening makes the small piece easier to cut, and sits nicely in the ring.


2.  Unscrew the ring off the cufflink.  Mine had a protective clear plastic circle in there - don't lose it, you need it!


3.  Use the circle as a template on the fabric to work out the area you want to cut.  I decided to fussy cut the background cycle chain links for this set.


4.  Cut out around the circle, using small sharp scissors is easiest.  Nail scissors would be ideal.


5.  You can choose to either place the fabric into the ring on it's own, or with the protective cover.  I chose to leave the cover in.


6.  Screw the cover back on to the base.  Repeat for the other cufflink - you are done!!!  Easy as that.


The best thing is - it's not permanent, nothing is glued in, so if you want to replace it with another fabric - you can!  This is the other set I did...


 Enjoy!