Shelley Made

Wednesday, 8 August 2012

Custom Size Tissue Pouch


This is the tutorial for sewing up my Custom Tissue Pouch - available at Spoonflower here

Materials List 
  • Pre-printed Cut & Sew fabric panel from Spoonflower
  • Coordinating thread
  • Sewing machine
  • Iron
  • A pocket pack of tissues


Calculations

Not all pocket tissue packs are created equal!!  If you want to - you can use the measurements from my Kleenex To Go size pack - which are as follows:

Length - 4.25 inches (4 1/2)

Width - 2.125 inches (2 1/8)

Depth - 1 inch

To calculate the size of the two fabric pieces we need, some very simple maths is required...using the measurements from your packet of tissues (or mine).  We are using quarter inch seam allowances throughout - so the extra 0.5 or 1 inch at the end of each calculation is to allow for all the seams we need to sew.

Measurement  1: (2 x width) + (2 x depth) + 0.5
Measurement 2: (length + depth) + 1

So for my tissue pack:

Measurement 1: (2 x 2.125) + (2 x 1) + 0.5 = 6.75
Measurement 2: (4.25+1)+1 = 6.25


We need two pieces of fabric for each tissue cover (an outer and a lining).  The fabric for the lining shows as a border strip around the opening of the tissue cover.  In order to do this, we add an inch to Measurement 1 for the lining, and subtract an inch from Measurement 1 for the outer.

Our final cutting dimensions are as follows:
 

Outer = (Measurement 1 - 1) x Measurement 2
Lining = (Measurement 1 + 1) x Measurement 2


For my pack

Outer = 5.75 x 6.25
Lining = 7.75 x 6.25


If you are using my fabric panels, the fabric provided is 20% bigger than my calculated pieces in both directions.  So if your pack is slightly bigger you should still have plenty of fabric to work with.  In either case - smaller or larger - just cut the fabric to suit the calculations you have just done.

The little robot is in the very centre of the fabric panel - and in order to have him wave at you when you have used the last tissue - please take that into consideration when cutting out that piece!  You will want to trim equal amounts of each side to keep him centred.

NOTE:  If you are using very lightweight fabric, you may want to consider using some fusible interfacing here...I've made them in quilting cotton before, and not interfaced, but if you have a preference for a stiffer feeling holder, then feel free to interface before you start sewing.


Construction

Take your two cut pieces of fabric and place them right sides together.  Line up one of the ends - one piece is longer than the other - this is correct.  They  should both be the same height though.


Sew a quarter inch seam along one of the ends.  Then match up the other end and sew another quarter inch seam.  You will now have a tube.


Centre the outer piece on the lining piece, and give it a press with your iron.   There should be half an inch of the lining showing on each side of the outer fabric.


Now sew another quarter inch seam along one of the long sides - remembering to backstitch at each end.  Next - sew about 3 inches along the last open side, leave an opening of an inch or so in the middle (remembering to backstitch on each end of the opening)  then continue all the way to the end.
 
Turn your piece through the opening you left.  Use a knitting needle, or other round-pointed instrument to push the corners out nicely.  Give it a really good press with your iron, remembering to tuck in your opening.


Find the centre point of the long sides.  I usually just fold it in half, and use my fingernail to press a slight crease into it.  With the outer fabric facing you, fold both short ends to meet in the middle where you creased.


Sew quarter inch seams along both ends - backstitching for reinforcement on each side where the slit for the tissues meets.


Turn through the right way - poke out the corners, and give it another press.  You are done!


Fill with your tissues...  When it is empty - the robot will wave at you!

Zippered Pencil Case Instructions


This is the tutorial for sewing up my Zippered Pencil Cases and Coin/Treasure Purses, available at Spoonflower here

Finished dimensions approx 9 inches by 5 1/4 inches for Pencil Case
Finished dimensions approx 4 1/2 by 3 3/4 inches for the Coin/Treasure purse.

Illustrated here is the Pencil Case, but the construction method is identical for both.


Materials

  • Zippered Pouch Cut and Sew Panel from Spoonflower
  • Optional fusible interfacing if using a lighter weight fabric such as quilting cotton or sateen
  • Coordinating zipper at least the width of the outer fabric panel
  • Coordinating thread

 Construction

Cut out the matching labelled fabric panels
You will end up with two outers, two lining and two zip end covers


If you are not using linen or one of the heavier weight fabrics, I would recommend you apply fusible interfacing to the outer fabrics before starting.
 
We first need to add the zip end covers.  Take each cover piece, and fold it in half - wrong sides and short ends together.

To find out where to sew the end covers - place the zip on the top of one piece of outer fabric.  Align the ends of the zip covers with the edges of the outer fabric, as shown in the photo.


Top stitch these in place close to the folds.  Make sure that the zipper pull itself is well inside the opening between the two ends you are attaching. Make sure you are also well clear of the metal end - you do not want to sew over that! I prefer to use a longer zip, and cut off the extra. Trim off the extra fabric on both sides.


Next - we create a sandwich of sorts.  Place one outer of fabric face up.  Place your zip face down and aligned with the raw edge at the top, and your zip covers at each side edge. 


Place a lining piece of fabric over the top of this - to complete the "sandwich".

Put a zipper foot on your machine.  Sew a 1/4 inch seam all the way along that top edge to secure the layers - making sure to more the zipper pull out of the way as you go. 
Fold the pieces right sides out.  You will now have this - one side of the pencil case done:

Next, we will repeat with the other side.  Make another sandwich - exactly the same as before...but on the other side of the zip.  Place your other outer piece right side up, then the zip face down just like before (so both outer fabrics face each other), then finally your other lining piece face down.  Sew another 1/4 inch seam.

Now, we should have something that looks like this...

Top...


and bottom..


Now is a good time to give it a press.  Pull the four pieces of fabric away from the zipper.  Press along the folds.

 Next - we will topstitch around the zipper (still using the zipper foot).  I used about 1/8 inch, and a longer stitch - about 3.5).  This will help keep everything nice and firmly in place - and will stop anything from catching in the zip.


Finally - sewing up the sides.  Switch back to your regular foot.  With right sides together, outer to outer, and lining to lining - sew a 3/8 inch seam around all edges.  In the photo below I've folded back the linings so you can see which fabrics are matched together.  Leave a gap of 1.5 inches on the long edge of the lining so you can turn through.  Make sure you have opened the zip before you do this - or you will have all sorts of difficulty turning through otherwise!  

Sew very slowly over the bulk at the zip ends...and make sure you "squash" the zip towards the lining on both sides - not towards the outer fabric.   The zip teeth should be next to the outer fabric, and the zip fabric is inside the lining...  See photo for details...


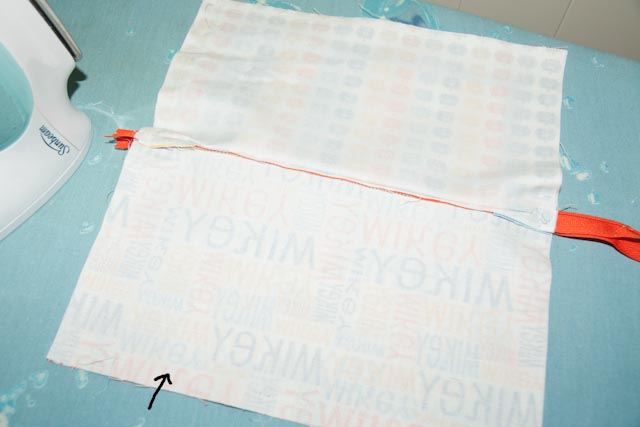
After sewing around - it will look like this.  The arrow indicates where my opening for turning is.

Trim off all four corners, so your corners will sit nicer after turning.  I also like to trim out some of the bulk where the zip ends are to get a better finish on the zip ends once turned.  Clip off any zip ends that overhang if you used a longer zip like I did.
 

Turn out through your opening.   Poke the corners out with a knitting needle, or other blunt instrument. 


Sew closed the opening in the lining with a very small seam. 


Push the lining into the outer.  I like to give it a little press just to finish.

You are done!


Sunday, 15 July 2012

A New Personalised Fabric

It's been a while since I did a new Personalised Fabric option... I've had a few people ask if I could do a pink one along the lines of my Turquoise Daisies...so I did, and here it is:

Personalised Name Fabric - Pink Birds

It matches the pink colourway of my Bluebirds fabric collection which is currently available on Spoonflower...

Pink Birds on Branches Bluebirds and Blossoms - Pink Cherry Blossom Branches - Pink Pink Blossoms Pink Bird Stripe Pink Blossom Stripe

The Bluebirds themselves are also in blue (funnily enough!), and a mix of light and mid purples...

Bluebird On My Shoulder Light Purple Birds on Branches Purple Birds on Branches

As usual, just contact me if you would like me to create it in any name you like...

Tuesday, 10 July 2012

My Stars and Stripes Matrix Fabric!

I'm very excited to say that my entry into the Spoonflower Stars and Stripes fabric design contest made the top 10!!  Sixth, to be exact...out of 328 entries!

The inspiration for this design was the movie - The Matrix...do you remember the falling binary screens???  Here is my version, called Falling Stars in Stripes (you can click on the image to go to the full design on Spoonflower):

Falling Stars in Stripes (Zoom Out for Effect)

I was very excited to find out I had placed in the Top 10 - and of all places I was in Queenstown, New Zealand when I got the email! :)   We never go anywhere - and I was desperate to check how it had printed, as the top 10 get put up for sale immediately!

Here is the photo Spoonflower took of the printed fabric:


I had to rotate the photo - when they took it, the fabric was upside down!! 

Thanks everyone that voted - I really appreciate it!!!

Sunday, 1 July 2012

How many times can you make the same little dress??

I made a dress for my daughter's first school visit the other day.  In fact, I made two, because she has grown, again!

That got me to wondering how many times I had used that pattern...and I was very surprised at the number.  Let's recap...

Number 1

My daughter was about 20 months in this photo...and this was the first real sewing I had done for her.  I think one other dress attempt before this with another pattern when she was about 8 months old, that she wore maybe once, and was an awful fit!  This was true to pattern, and I still love it.  In fact, I've kept it!  Corduroy with the cutest little buttons...


Number 2


About 2 months later, I made it again...again, true to the pattern - this time I chose appliqued hearts.  Loved the little tights with this one!


Number 3


This one was her 2nd birthday dress!  I left off the appliques, and made it from a stretchy merino wool knit.  I used metal snaps rather than buttons.


Number 4


Exactly the same as number 3, but for my little niece Emma, and in a jade-green colour, again for my daughter's second birthday, so Emma would be about 5 months.  I think this is the first actual photo of me on my blog!! :)


Number 5

Exactly the same as 3 and 4 but a scarlett red merino...can't find a photo...but made for my niece's first birthday...so no wonder no photo!  My little boy was only about 4 weeks old then.  I can't believe I was sewing!


Number 6


I love this one!  Blue is so my daughter's colour...  This one was for a trip to my niece's 2nd birthday, so my daughter was about 3.5 years.  I did white satin stitching around a deep hem - ended up looking like piping!  I appliqued the daisy on the front.  It's from Bunnycup Embroidery - I used plain coloured corduroy, and skipped the smiley face...but this is what it looks like close up...


Number 7

For my niece's second birthday...just like her big cousin's, except orange!

Number 8


This is my favourite of all I think.  Lots of double thread contrast topstitching, and a lovely appliqued bird.  I cut made the "bodice" section of the pattern in dark purple, and the "skirt" in light purple, and did reverse colour topstitching on each part.  Made it at the same time as the daisy dresses...


Number 9


A very rushed - got to wear a costume to Kindy tomorrow dress!  She decided she wanted to be a princess, so I made this out of pieces of old bedding fabric I had lying around.  I made the basic dress out of some heavy bedspread fabric, and gathered a piece of sheer fabric from an old duvet - attached it around the middle of the dress, adding a sash and tie from the duvet lining to hide the gathers.  Did a rolled hem around the bottom of the sheer. 

Number 10


After making so many of these dresses, I had a break from the pattern!  This was was made for my daughter's first school visit.  I sliced the pattern and put a white stripe up both the front and back.  You can't see it from here, but when I stitched the hem - I used matching thread!  So blue on blue, white in white.  Yes, it took longer...but I thought it looked better! :)

Number 11


This one she wore for her last day, and farewell from Kindergarten.  I added a contrast strip at the hem, and did some topstitching detail.  No appliques here!  I was going to add pockets, but ran out of time!  Also ran out of time to take a decent photo!


Wow...11 times I've made this dress.  From toddler to school girl, and each year in between.  She's growing up so fast!

For those of you interested, the pattern is New Look 6576 and New Look 6578 (baby or toddler sizes).

Sunday, 3 June 2012

A Very Special Reupholstery Project

A month ago, I was contacted by a lovely lady from Michigan called Janet.  She had seen my personalized fabrics and asked if I could create a design with the name "Anna" for her daughter-in-law Leslie.

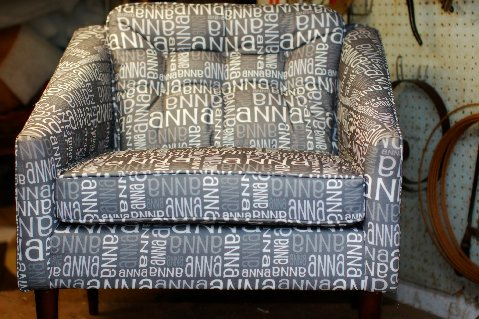
As it turns out, Anna was the name of Leslie's mother, who had very sadly passed away a few years ago.  Leslie had a chair that belonged to her mother, and Janet's plan was to reupholster it for her, as a surprise, using the fabric with her mother's name on it.  I was only too happy to help with such a thoughtful and personal project.

With the help of her son, they did manage to keep the secret throughout the process, and I am delighted to report that the project was a success - Leslie loves the chair!

I cannot think of a more touching use of my fabric, and I am so extremely proud and honoured to have been part of this very special project.  What a wonderful thing for a mother-in-law to do...

Here is the finished chair...


A local Michigan upholsterer, Edwin Adams, is pictured below with the chair.  The care he has taken is apparent - from the piping to the fabric covered buttons.  Lovely work Edwin!


Thank you so much Janet - for allowing me to share these photos of the finished chair.  I have to admit to being very touched myself when I saw the photos, and when you told me of your daughter-in-law's comment..."now I can sit with my Mom every day".  I really hope you do smile every time you look at it Leslie... :)

Everyone out there - if you can, go give your mother a hug!